
IPv6 with Amazon Web Services VPC and EC2
Notice: This article is more than 8 years old. It might be outdated.
On December 1st, 2016 AWS released IPv6 Support for EC2 Instances in Virtual Private Clouds (VPCs), currently limited to the US-East-2 (Ohio) region.
This post will show you how to enable your existing Default VPC and Default Subnets for IPv6.
Background
Amazon Virtual Private Cloud (Amazon VPC) enables you to launch Amazon Web Services (AWS) resources into a virtual network that you’ve defined. This virtual network closely resembles a traditional network that you’d operate in your own data center, with the benefits of using the scalable infrastructure of AWS. A virtual private cloud (VPC) is logically isolated from other virtual networks in the AWS Cloud and allows you to launch your AWS resources, such as Amazon EC2 instances, isolated from other VPCs within your own or other accounts.
A default VPC allows you to jump-start your AWS EC2 experience, without having to worry about VPCs and subnets. It is ready for you to use — you can immediately start launching instances into your default VPC without having to perform any additional configuration steps.
Unfortunately with the introduction of IPv6 within VPC, you do need to once perform some manual configuration steps in order to enable your VPC for IPv6. This blog post will show you the minimal required steps to do so.
Pre-Requisites
Please note that as of this writing IPv6 within VPC is only in the US-East-2 (Ohio) region. You therefore need to perform the below configurations in this region. Within your AWS Console, navigate to VPC section within the US-East-2 (Ohio) region.
Enable Default VPC and Default Subnets for IPv6
Edit VPC CIDR for IPv6
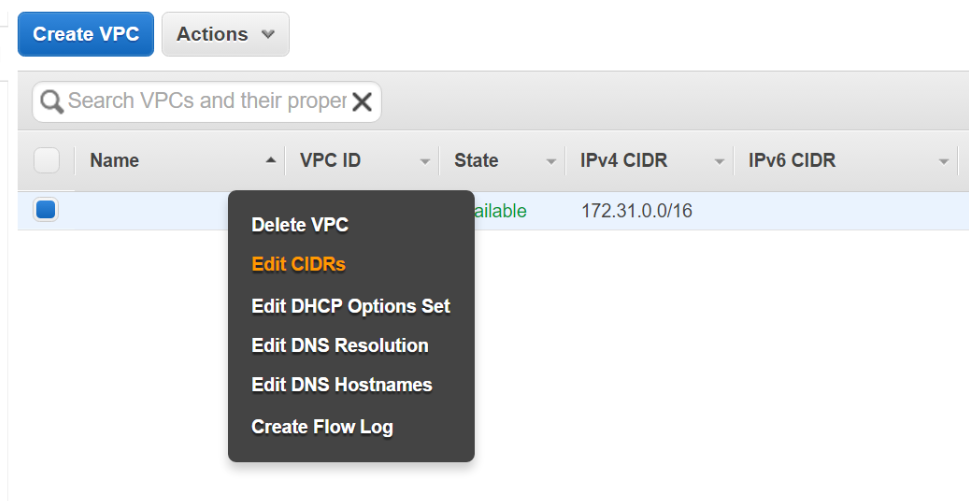
Each default VPC comes with a default IPv4 CIDR block of 172.31.0.0/16, but no default IPv6 CIDR block (See Figure 1). Therefore the first step is to allocated a /56 IPv6 block from the Amazon provided IPv6 block to your VPC.
First, right-click on your Default VPC and select Edit CIDRS (See Figure 1).
Within the VPC IPv6 CIDRS section click on Add IPv6 CIDR to allocate a random /56 CIDR from the Amazon IPv6 address pool to your Default VPC (See Figure 2).
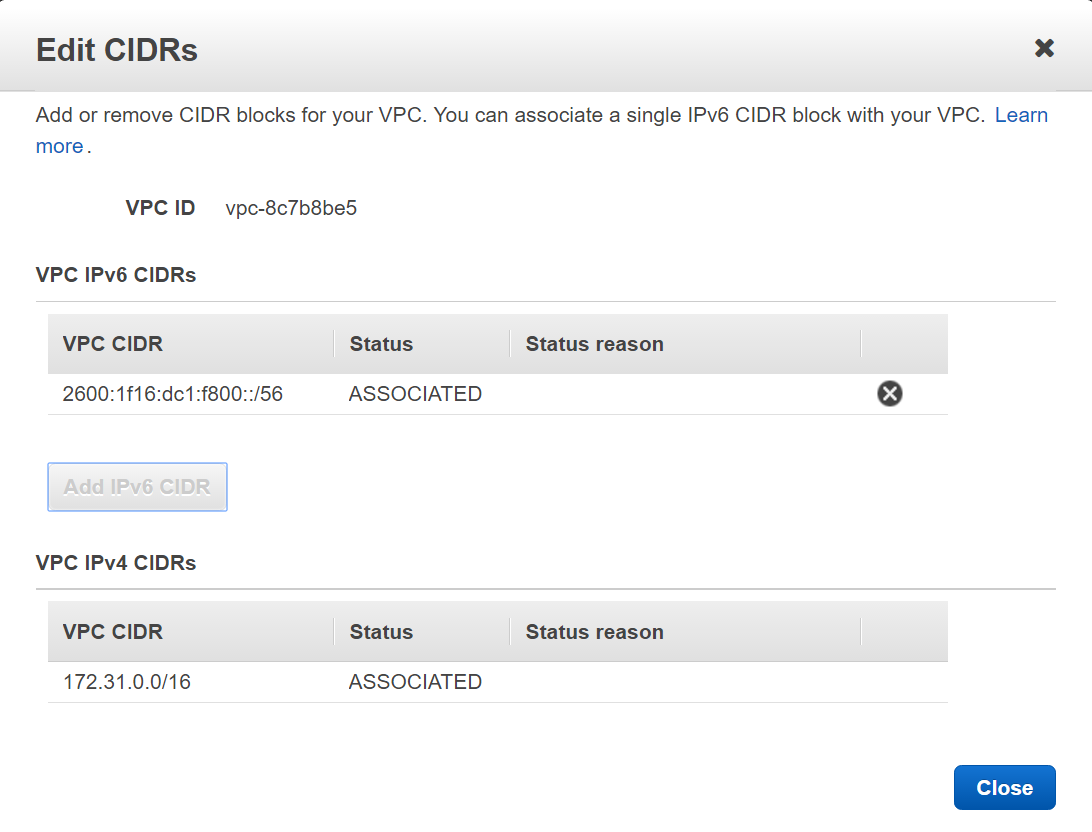
All your IPv6 subnets will come from this /56 IPv6 CIDR block.
Edit Subnet CIDRs
Your default VPC will come with one subnet per Availability Zone (AZ). As US-East-2 (Ohio) has three availability zones, you will have the subnets 172.31.0.0/20 for the AZ us-east-2a, 172.31.16.0/20 for the AZ us-east-2b, and 172.31.32.0/20 for the AZ us-east-2c. In this step we will want to assign each of these subnets a /64 IPv6 CIDR block.
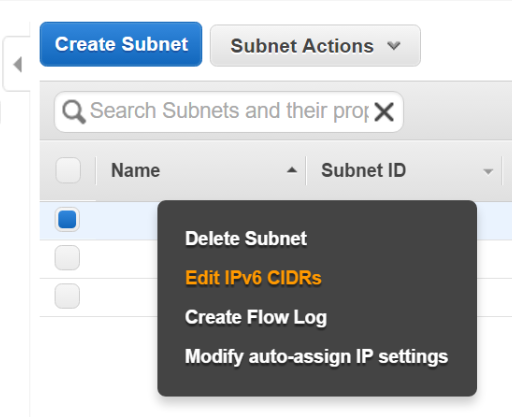
Navigate to the Subnets. Start with a right-click on the first subnet and select Edit IPv6 CIDRs (See Figure 3).
Within the VPC IPv6 CIDRs section click on Add IPv6 CIDR. Confirm your selection by clicking on the check mark to the right of the line (See Figure 4).
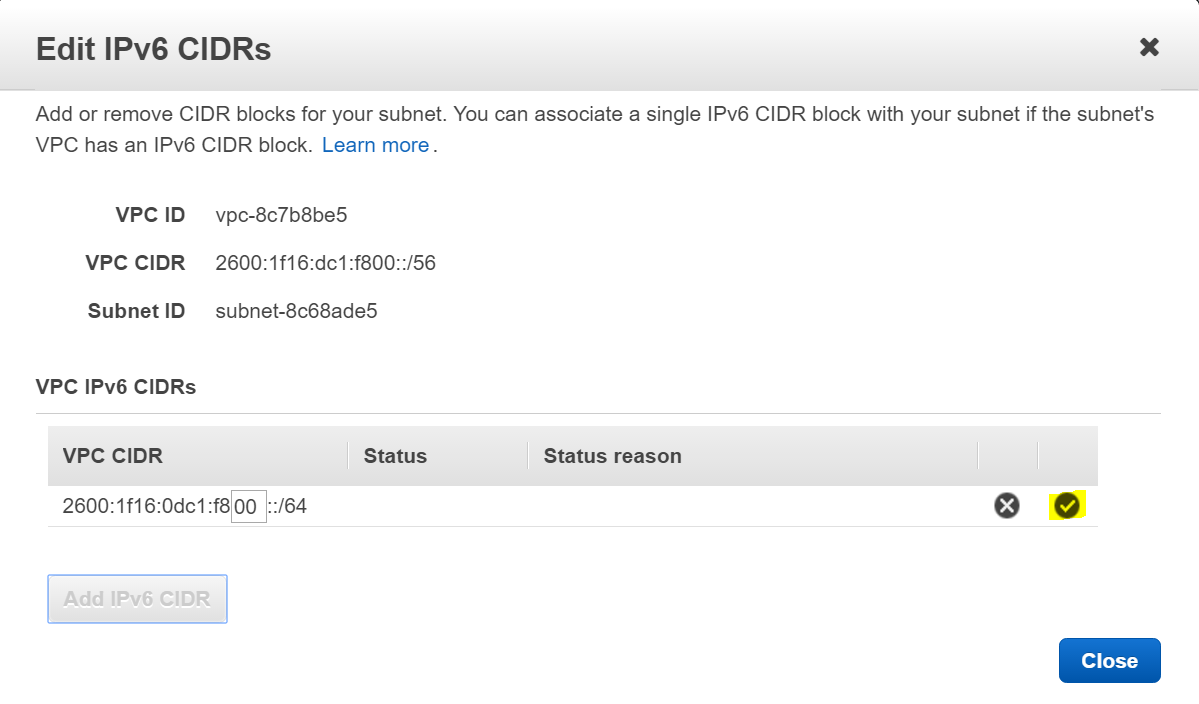
Close the window and repeat the above steps for the remaining two subnets. After you’re done, each subnet should have a distinct /64 CIDR allocated to it (See Figure 5).

Enable auto-assign of IPv6 addresses
By default each EC2 instance launched into the default VPC will be assigned a public IPv4 address. The instance can therefore not only reach other hosts on the Internet, but is also reachable from them Internet. The same is not true for IPv6. Instead your default subnets have to be enabled to automatically assign an IPv6 to each newly created EC2 instance within the default VPC. With the configuration in the last step of this blog post, this will ensure that each new EC2 instance within your default VPC will have outbound connectivity over IPv6, but will also be reachable from the Internet over IPv6.
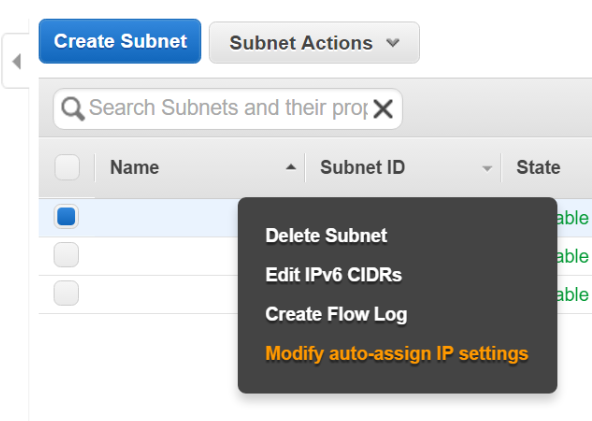
Perform a right-click on your first default subnet and select Modify auto-assign IP settings (See Figure 6).
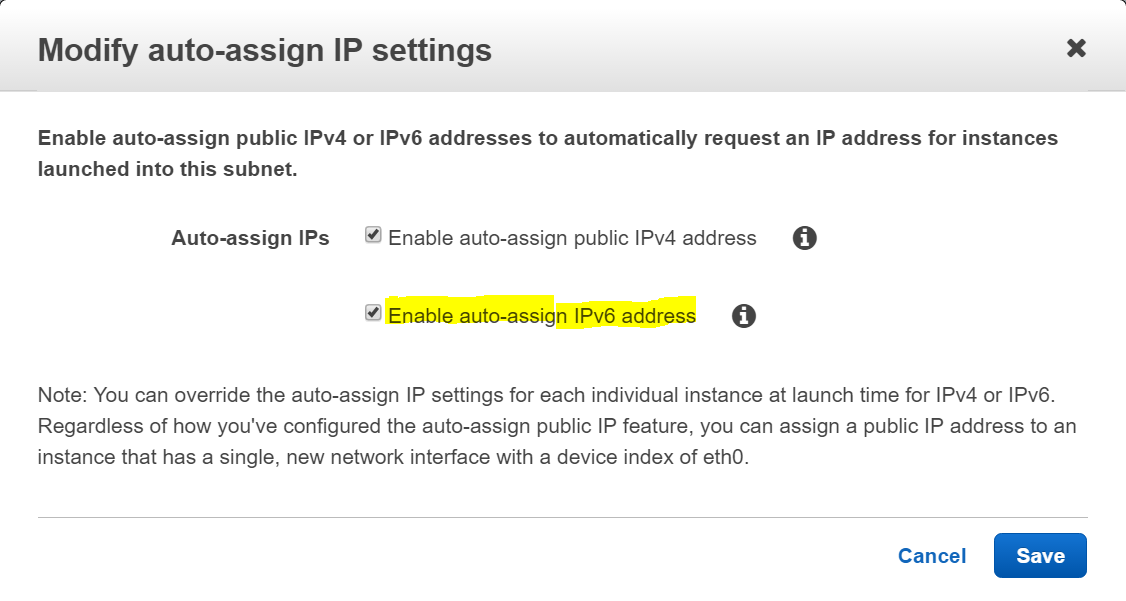
Next, enable the tick box for Enable auto-assign IPv6 address (See Figure 7).
Close the window and repeat the above steps for the remaining two subnets.
Update the route table
As a last step we need to update the route table for the default VPC with a default route to the Internet Gateway. This will allow our EC2 instances to be able to reach hosts on the Internet via IPv6, but also to be reachable from the Internet.
In case you only want your EC2 instances to reach the outside world but not be reachable via the Internet over IPv6, you need to first create an “Egress Only Internet Gateway”. This concept is new to VPC and only available for IPv6. It allows you to block incoming traffic while still allowing outbound traffic (think of it as an Internet Gateway mated to a Security Group).
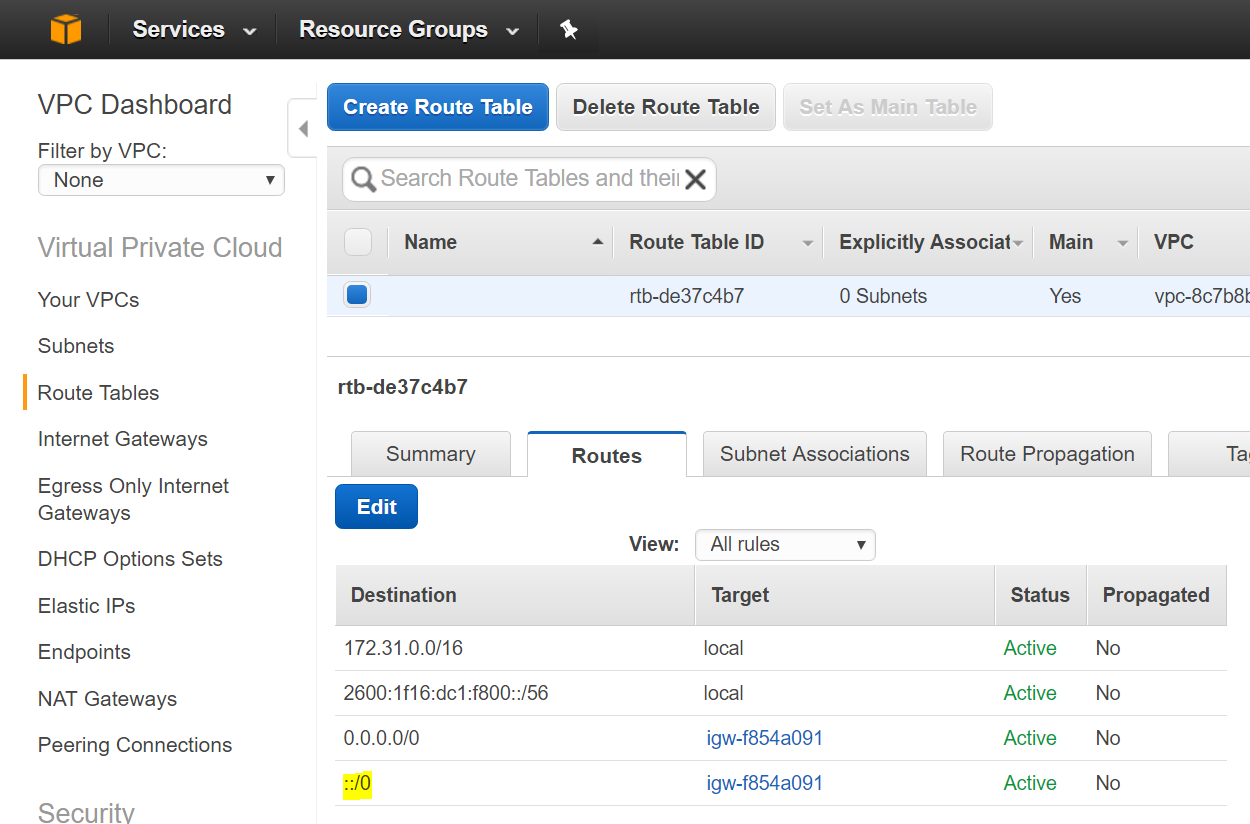
Navigate to the “Route Tables”, select the route table for your default VPC and click Edit. Add a route with the Destination of “::/” and the target of your Internet Gateway (See Figure 8).
Launching EC2 instances
You can now head over to EC2 within the AWS Console and launch your first IPv6-enabled EC2 instance.
AWS uses stateful IPv6 address assignment. Therefore IPv6 addresses are assigned via DHCPv6 and not Stateless Autoconfiguration (SLAAC). Most operating systems (OS) are not prepared to acquire an IPv6 address via DHCPv6 out of the box and AWS has unfortunately only updated the AMI for Amazon Linux to do so. The common AMI for Ubuntu 16.04 will fail to acquire an IPv6 address out of the box and the Windows 2016 AMI should be updated to disable Teredo.
Also older versions of Ubuntu Linux and Windows 2016 might have issues picking up an IPv6 address at all. Here it is recommended to use the latest AMI version.
Ubuntu 16.04
Under Ubuntu 16.04 you will need to update the new file “/etc/network/interfaces.d/60-eth0-with-ipv6.cfg” and add the following content:
iface eth0 inet6 dhcp
Afterwards restart the network stack with sudo service networking restart.
Using the command ip -6 address you will see the IPv6 address assigned to eth0 via DHCPv6:
ubuntu@ip-172-31-8-35:~$ ip -6 address
1: lo: <LOOPBACK,UP,LOWER_UP> mtu 65536 state UNKNOWN qlen 1
    inet6 ::1/128 scope host
       valid_lft forever preferred_lft forever
2: eth0: <BROADCAST,MULTICAST,UP,LOWER_UP> mtu 9001 state UP qlen 1000
    inet6 2600:1f16:dc1:f800:4e68:4a28:f5b6:22bd/128 scope global
       valid_lft forever preferred_lft forever
    inet6 fe80::6d:ceff:fe42:4535/64 scope link
       valid_lft forever preferred_lft forever
You can also pass the following script via User Data, when creating a new Ubuntu instance:
#!/bin/bash
echo "iface eth0 inet6 dhcp" >> /etc/network/interfaces.d/60-eth0-with-ipv6.cfg
dhclient -6 -N
This will setup DHCPv6 persistently for subsequent boots and acquire an IPv6 during the initial boot.
Ubuntu 14.04
The above instructions for Ubuntu 16.04 do not work under Ubuntu 14.04 and actually render an EC2 host inaccessible.
Instead you will need to update the file /etc/network/interfaces.d/eth0.cfg to look like this:
auto eth0
iface eth0 inet dhcp
    up dhclient -6 $IFACE
Here, you can also pass the following script via User Data, when creating a new Ubuntu instance:
#!/bin/bash
echo "    up dhclient -6 $IFACE" >> /etc/network/interfaces.d/eth0.cfg
dhclient -6 -N
This will setup DHCPv6 persistently for subsequent boots and acquire an IPv6 during the initial boot.
RHEL 7 / CentOS 7
If you’re using Redhat Enterprise Linux 7 or CentOS 7 you will need to update two files:
First update /etc/sysconfig/network to look like this:
NETWORKING=yes
NETWORKING_IPV6=yes
Next update /etc/sysconfig/network-scripts/ifcfg-eth0 to this content:
DEVICE="eth0"
BOOTPROTO="dhcp"
IPV6INIT=yes
DHCPV6C=yes
NM_CONTROLLED=no
ONBOOT="yes"
TYPE="Ethernet"
USERCTL="yes"
PEERDNS="yes"
Same as with Ubuntu you can also pass the following script via User Data, when creating a new RHEL7/CentOS7 instance:
#!/bin/bash
echo "NETWORKING_IPV6=yes" >> /etc/sysconfig/network
echo -e "BOOTPROTO=\"dhcp\"\nIPV6INIT=\"yes\"\nDHCPV6C=\"yes\"\nNM_CONTROLLED=\"no\"" >> /etc/sysconfig/network-scripts/ifcfg-eth0
service network restart
This will setup DHCPv6 persistently for subsequent boots and acquire an IPv6 during the initial boot.
RHEL 6 / CentOS 6
While RHEL 6 and CentOS should follow the same process as RHEL 7 and CentOS 7, it includes a bug which prevents DHCPv6 from being usable and has only been fixed in very recent versions. Therefore before you can use the above configuration you need to change the file /etc/sysconfig/network-scripts/ifup-eth and change line 327 from if /sbin/dhclient “$DHCLIENTARGS”; then to if /sbin/dhclient $DHCLIENTARGS; then. Yes, that’s correct: Just drop the double quotes.
Windows Server 2016
The AMI for Windows Server 2016 configured to create an IPv6 over IPv4 tunnel via Teredo. The security implications for using IPv6 over IPv4 tunnels are described in RFC7123, while RFC6169 clearly spells out the security concerns with IPv6 tunnels.
Instead we want to solely use a native IPv6 address and disable any IPv6 over IPv4 tunnels.
Open a command prompt in your Windows Server 2016 instance. First remove the Teredo and Isatap tunnel support:
netsh int ipv6 isatap set state disabled
netsh interface teredo set state disable
Your Windows host will now solely have IPv6 connectivity via the Ethernet interface.
But you might notice that your Windows instance will prefer IPv4 connections over IPv6. You can easily test this by opening http://test-ipv6.com/ from a browser on the Windows instance.
This non-recommended behavior can be fixed by downloading and running the Microsoft easy fix wizard for “Prefer IPv6 over IPv4 in prefix policies” from the Windows Support Guidance for configuring IPv6 in Windows for advanced users article. It’s the second item in the second row.
Summary
This blog post showed you how to retrofit your AWS Default VPC and subnets for IPv6. It also showed you how to enable Ubuntu 16.04 and Windows Server 2016 to acquire an IPv6 address via DHCPv6.
Leave a comment