
AWS Site-to-Site VPN with IPSec VPN (Strongwan) and BGP (FRRouting)
Notice: This article is more than 5 years old. It might be outdated.
This blog post walks through the setup of an EC2-based VPN endpoint - using Ubuntu Linux 18.04 with Strongswan and FRRouting - for a Site-to-Site VPN connection to AWS with BGP routing. It will allow you to experiment with BGP in your AWS account, test out new AWS features such as AWS Transit Gateway or use it for many other things. Especially if you are interested in learning more about the interaction of BGP over a Site-to-Site VPN with AWS Transit Gateway, this is an easy way to do so.
The desired final setup will look like depicted in Figure 1. The AWS Transit Gateway connects on one side to a VPC with the CIDR 172.31.0.0/16 and on the other side to an AWS Site-to-Site VPN. This AWS Site-to-Site VPN connects to an EC2-based router, which uses Strongswan for IPSec and FRRouting for BGP. To make things interesting the EC2-based router has a second network interface on a private subnet of 10.16.16.0/24, which can be announced via BGP.

While Transit Gateway and EC2 instance can reside in the same AWS account and even AWS region, the EC2 instance should reside in a different VPC than connected to the Transit Gateway.
AWS Transit Gateway
AWS Transit Gateway is a service that enables customers to connect their Amazon Virtual Private Clouds (VPCs) and their on-premises networks to a single gateway. For on-premises connectivity the AWS Transit Gateway allows you to leverage AWS Site-to-Site VPNs (IPSec) or AWS Direct Connect via AWS Direct Connect Gateways (See Figure 2).
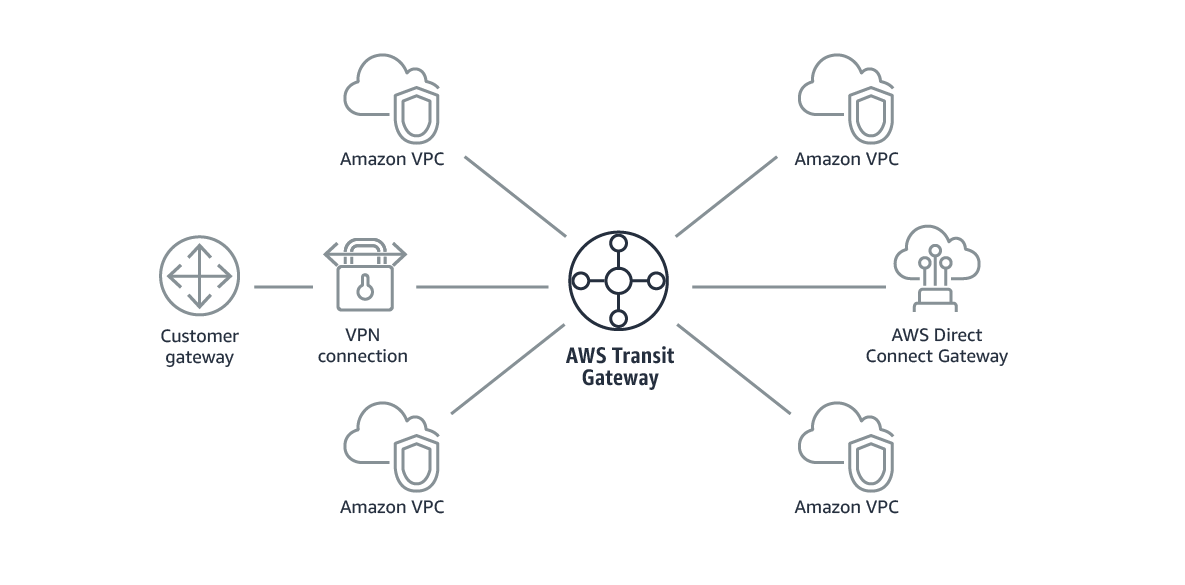
A transit gateway acts as a regional virtual router for traffic flowing between your virtual private clouds (VPC) and VPN or DX connections. A transit gateway scales elastically based on the volume of network traffic. Routing through a transit gateway operates at layer 3, where the packets are sent to a specific next-hop attachment, based on their destination IP addresses.
The AWS Transit Gateway’s hub and spoke model simplifies management and reduces operational costs because each network only has to connect to the Transit Gateway and not to every other network. Any new VPC is simply connected to the Transit Gateway and is then automatically available to every other network that is connected to the Transit Gateway. This ease of connectivity makes it easy to scale your network as you grow.
Transit Gateway and Site-to-Site VPN setup
Follow the AWS documentation for setting up the AWS Transit Gateway and attaching it to an AWS Site-to-Site VPN.
It is recommended to configure “VPN ECMP support” with “enable” to enable Equal Cost Multipath (ECMP) routing support between VPN connections. This will allow you to use both tunnels of the AWS Sit-to-Site VPN connection at the same time.
Linux-based Router
This setup uses Ubuntu 16.04-LTS, Xenial Xerus as the Linux distribution for the EC2-based VPN gateway and router. Strongswan provides the IPSec termination for the AWS Site-to-Site VPN connection. And FRRouting provides the dynamic routing capabilities for BGP.
Interface Setup
As mentioned earlier the Ubuntu Linux EC2 instance uses a secondary network interface on a private subnet. This subnet is announced via BGP towards the AWS Transit Gateway. AWS Premium Support provides a detailed instruction on how to make a secondary network interface work in Ubuntu EC2 instances. The presented concepts are used here.
First create a configuration file for the secondary interface at /etc/network/interfaces.d/99-eth1.cfg. his example uses a secondary interface of ‘eth1’. Be sure to change ‘eth1’ to match your secondary interface name.
#
# /etc/network/interfaces.d/99-eth1.cfg
#

auto eth1
iface eth1 inet dhcp

# control-alias eth0
iface eth1 inet6 dhcp
Next create the restrict-default-gw file to prevent the default gateway from being overwritten on the main table via the /etc/dhcp/dhclient-enter-hooks.d/restrict-default-gw file.
#
# /etc/dhcp/dhclient-enter-hooks.d/restrict-default-gw
#

case ${interface} in
  eth0)
    ;;
  *)
    unset new_routers
    ;;
esac
After restarting your network the secondary interface should acquire an IPv4 and IPv6 address.
root@host:~# systemctl restart networking
root@host:~# ifconfig eth1
eth1      Link encap:Ethernet  HWaddr 02:7b:35:90:92:ae
          inet addr:10.16.16.254  Bcast:10.16.16.255  Mask:255.255.255.0
          inet6 addr: fe80::7b:35ff:fe90:92ae/64 Scope:Link
          inet6 addr: 2600:1f16:f2d:1211:2c35:28f7:7d5d:f776/128 Scope:Global
          UP BROADCAST RUNNING MULTICAST  MTU:9001  Metric:1
          RX packets:9081 errors:0 dropped:0 overruns:0 frame:0
          TX packets:2143 errors:0 dropped:0 overruns:0 carrier:0
          collisions:0 txqueuelen:1000
          RX bytes:854331 (854.3 KB)  TX bytes:213798 (213.7 KB)
Source or Destination checking
In AWS the Source or Destination checking attribute on an interface determines whether an instance can handle network traffic that isn’t specifically destined for the instance.
Before installing Strongswan on your EC2 instance disable Source/Destination Checks for this instance. Keep in mind that this needs to be done for both interfaces (ENIs) separately.
Security Group setup
Within the security group for the external interface: Make sure to allow inbound traffic using UDP port 500 (ISAKMP) and 4500 (IPsec NAT-Traversal) from both of the AWS Virtual Private Gateways.
For the security group on the internal interface: Here you want to allow any traffic that you want to be transported inside of the AWS Site-to-Site VPN tunnels.
Strongswan setup
Next use apt-get update && apt-get install -y strongswan to install Strongswan on the Ubuntu Linux 16.04 instance.
Update the configuration file /etc/ipsec.conf with generic settings for an AWS Site-to-Site VPN, as well as the specific settings for the two tunnels that each AWS Site-to-Site VPN provides. Make sure to replace the relevant IPv4 addresses from this example with your IPv4 addresses.
 #
 # /etc/ipsec.conf
 #
 conn %default
         # Authentication Method : Pre-Shared Key
         leftauth=psk
         rightauth=psk
         # Encryption Algorithm : aes-128-cbc
         # Authentication Algorithm : sha1
         # Perfect Forward Secrecy : Diffie-Hellman Group 2
         ike=aes128-sha1-modp1024!
         # Lifetime : 28800 seconds
         ikelifetime=28800s
         # Phase 1 Negotiation Mode : main
         aggressive=no
         # Protocol : esp
         # Encryption Algorithm : aes-128-cbc
         # Authentication Algorithm : hmac-sha1-96
         # Perfect Forward Secrecy : Diffie-Hellman Group 2
         esp=aes128-sha1-modp1024!
         # Lifetime : 3600 seconds
         lifetime=3600s
         # Mode : tunnel
         type=tunnel
         # DPD Interval : 10
         dpddelay=10s
         # DPD Retries : 3
         dpdtimeout=30s
         # Tuning Parameters for AWS Virtual Private Gateway:
         keyexchange=ikev1
         rekey=yes
         reauth=no
         dpdaction=restart
         closeaction=restart
         leftsubnet=0.0.0.0/0,::/0
         rightsubnet=0.0.0.0/0,::/0
         leftupdown=/etc/ipsec-vti.sh
         installpolicy=yes
         compress=no
         mobike=no
conn AWS-VPC-GW1
         # Customer Gateway: :
         left=10.16.1.254
         leftid=18.123.45.67
         # Virtual Private Gateway :
         right=35.98.76.54
         rightid=35.98.76.54
         auto=start
         mark=100
         #reqid=1
conn AWS-VPC-GW2
         # Customer Gateway: :
         left=10.16.1.254
         leftid=18.123.45.67
         # Virtual Private Gateway :
         right=54.98.76.54
         rightid=54.98.76.54
         auto=start
         mark=200
Next update the configuration file /etc/ipsec.secrets with the Pre-Shared Keys of your AWS Site-to-Site VPN. Here also ensure that you update the IPv4 addresses from this example with the IPv4 addresses of your setup.
#
# /etc/ipsec.secrets
#

# This file holds shared secrets or RSA private keys for authentication.

# RSA private key for this host, authenticating it to any other host
# which knows the public part.
18.123.45.67 35.98.76.54 : PSK "7?-Mun7^XC3JUswf$f$mm=8s@v2U=-aG"
18.123.45.67 54.98.76.54 : PSK "!yTF%t$nQTwp++6rB9#qft?Vfa%KAhnU"
As we want to run a dynamic routing protocol with BGP over this AWS Site-to-Site VPN, we need to use a route-based VPN setup instead of a policy-based one.
The bash script in file /etc/ipsec-vti.sh sets up the virtual tunnel interfaces for a route-based IPSec VPN. Also here make sure to replace the IPv4 addresses of this example with the IPv4 addresses of your setup.
#!/bin/bash

#
# /etc/ipsec-vti.sh
#

IP=$(which ip)
IPTABLES=$(which iptables)

PLUTO_MARK_OUT_ARR=(${PLUTO_MARK_OUT//// })
PLUTO_MARK_IN_ARR=(${PLUTO_MARK_IN//// })
case "$PLUTO_CONNECTION" in
AWS-VPC-GW1)
VTI_INTERFACE=vti1
VTI_LOCALADDR=169.254.12.38/30
VTI_REMOTEADDR=169.254.12.37/30
;;
AWS-VPC-GW2)
VTI_INTERFACE=vti2
VTI_LOCALADDR=169.254.14.230/30
VTI_REMOTEADDR=169.254.14.229/30
;;
esac

case "${PLUTO_VERB}" in
up-client)
#$IP tunnel add ${VTI_INTERFACE} mode vti local ${PLUTO_ME} remote ${PLUTO_PEER} okey ${PLUTO_MARK_OUT_ARR[0]} ikey ${PLUTO_MARK_IN_ARR[0]}
$IP link add ${VTI_INTERFACE} type vti local ${PLUTO_ME} remote ${PLUTO_PEER} okey ${PLUTO_MARK_OUT_ARR[0]} ikey ${PLUTO_MARK_IN_ARR[0]}
sysctl -w net.ipv4.conf.${VTI_INTERFACE}.disable_policy=1
sysctl -w net.ipv4.conf.${VTI_INTERFACE}.rp_filter=2 || sysctl -w net.ipv4.conf.${VTI_INTERFACE}.rp_filter=0
$IP addr add ${VTI_LOCALADDR} remote ${VTI_REMOTEADDR} dev ${VTI_INTERFACE}
$IP link set ${VTI_INTERFACE} up mtu 1436
$IPTABLES -t mangle -I FORWARD -o ${VTI_INTERFACE} -p tcp -m tcp --tcp-flags SYN,RST SYN -j TCPMSS --clamp-mss-to-pmtu
$IPTABLES -t mangle -I INPUT -p esp -s ${PLUTO_PEER} -d ${PLUTO_ME} -j MARK --set-xmark ${PLUTO_MARK_IN}
$IP route flush table 220
#/etc/init.d/bgpd reload || /etc/init.d/quagga force-reload bgpd
;;
down-client)
#$IP tunnel del ${VTI_INTERFACE}
$IP link del ${VTI_INTERFACE}
$IPTABLES -t mangle -D FORWARD -o ${VTI_INTERFACE} -p tcp -m tcp --tcp-flags SYN,RST SYN -j TCPMSS --clamp-mss-to-pmtu
$IPTABLES -t mangle -D INPUT -p esp -s ${PLUTO_PEER} -d ${PLUTO_ME} -j MARK --set-xmark ${PLUTO_MARK_IN}
;;
esac

# Enable IPv4 forwarding
sysctl -w net.ipv4.ip_forward=1
sysctl -w net.ipv4.conf.eth0.disable_xfrm=1
sysctl -w net.ipv4.conf.eth0.disable_policy=1
As this is a bash script, don’t forget to make the file executable:
chmod +x /etc/ipsec-vti.sh
Afterwards restart the Strongwan daemon to load the configuration changes and establish the tunnels:
systemctl restart strongswan
Strongswan validation
You can validate that the two tunnel interfaces vti1 and vti2 are up and running with the commands ip -s tunnel show or
ifconfig vti1. You should see the IP address of the tunnels displayed within the 169.254.0.0/16 range.
Looing at the tunnel status you should see bytes being send (TX) and received (RX) for both tunnels.
ubuntu@host:~$ ip -s tunnel show
vti1: ip/ip remote 35.98.76.54 local 18.123.45.67 ttl inherit nopmtudisc key 100
RX: Packets    Bytes        Errors CsumErrs OutOfSeq Mcasts
    12         792          0      0        0        0
TX: Packets    Bytes        Errors DeadLoop NoRoute  NoBufs
    12         714          7      0        7        0
vti2: ip/ip remote 54.98.76.54 local 18.123.45.67 ttl inherit nopmtudisc key 200
RX: Packets    Bytes        Errors CsumErrs OutOfSeq Mcasts
    4          240          0      0        0        0
TX: Packets    Bytes        Errors DeadLoop NoRoute  NoBufs
    4          160          7      0        7        0
ip_vti0: ip/ip remote any local any ttl inherit nopmtudisc key 0
RX: Packets    Bytes        Errors CsumErrs OutOfSeq Mcasts
    0          0            0      0        0        0
TX: Packets    Bytes        Errors DeadLoop NoRoute  NoBufs
    0          0            0      0        0        0
Similarly you should see the interface in an “UP” state.
ubuntu@host:~$ ifconfig vti1
vti1: flags=209<UP,POINTOPOINT,RUNNING,NOARP>  mtu 1436
        inet 169.254.12.38  netmask 255.255.255.252  destination 169.254.12.37
        inet6 fe80::5efe:ac1f:27e0  prefixlen 64  scopeid 0x20<link>
        tunnel   txqueuelen 1000  (IPIP Tunnel)
        RX packets 12  bytes 792 (792.0 B)
        RX errors 0  dropped 0  overruns 0  frame 0
        TX packets 12  bytes 714 (714.0 B)
        TX errors 7  dropped 0 overruns 0  carrier 7  collisions 0
FRRouting Setup
Follow the FFRouting documentation for installing FFRouting on Ubuntu 18.04 or have a look at my installation script.
When configuring the /etc/frr/daemons file, ensure to enable the bgpd daemon.
You can now connect via the vtysh Modal CLI to the router process.
ubuntu@host:~$ sudo vtysh

Hello, this is FRRouting (version 4.0+cl3u10).
Copyright 1996-2005 Kunihiro Ishiguro, et al.
First we configure the BGP process with the provided AS number and the two VPN-based peers. We also chose to announce our local private subnet 10.16.16.0/24.
host# conf t
host(config)# router bgp 65016
host(config-router)# no bgp ebgp-requires-policy
host(config-router)# neighbor 169.254.12.229 remote-as 64512
host(config-router)# neighbor 169.254.14.37 remote-as 64512
host(config-router)# address-family ipv4 unicast
host(config-router-af)# neighbor 169.254.12.229 soft-reconfiguration inbound
host(config-router-af)# neighbor 169.254.14.37 soft-reconfiguration inbound
host(config-router-af)# network 10.16.16.0/24
host(config-router-af)# end
host# wr
Next we can check if all interfaces are up and running. Besides eth0 and eth1 with IPv4 and IPv6 addresses, we should also see vti1 and vti2 for the IPSec tunnel interfacces.
host# sh int brief
Interface       Status  VRF             Addresses
---------       ------  ---             ---------
eth0            up      default         10.16.1.254/24
                                        + 2600:1f16:e4d:1a01:fbe6:fa0b:929b:4d72/128
eth1            up      default         10.16.16.254/24
                                        + 2600:1f16:e4d:1a11:2c38:23f7:7a5d:f773/128
ip_vti0         down    default
lo              up      default
vti1            up      default         169.254.12.38/32
vti2            up      default         169.254.14.230/32
Validation
EC2-Based Router
Now it’s time to validate that the AWS Transit Gateway is providing us with routes over BGP. Here we can see that the route for the VPC attached to the Transit Gateway is propagated via BGP to us.
host# sh ip route bgp
Codes: K - kernel route, C - connected, S - static, R - RIP,
       O - OSPF, I - IS-IS, B - BGP, E - EIGRP, N - NHRP,
       T - Table, v - VNC, V - VNC-Direct, A - Babel, D - SHARP,
       F - PBR,
       > - selected route, * - FIB route

B>* 172.31.0.0/16 [20/100] via 169.254.14.229, vti2, 00:23:10
  *                        via 169.254.12.37, vti1, 00:23:10
Notice that in case you configured the AWS Transit Gateway with Equal-cost multi-path routing (ECMP), you will see the remote VPCs CIDR of 172.31.0.0/16 announced over both AWS Site-to-Site VPN tunnels.
AWS Console
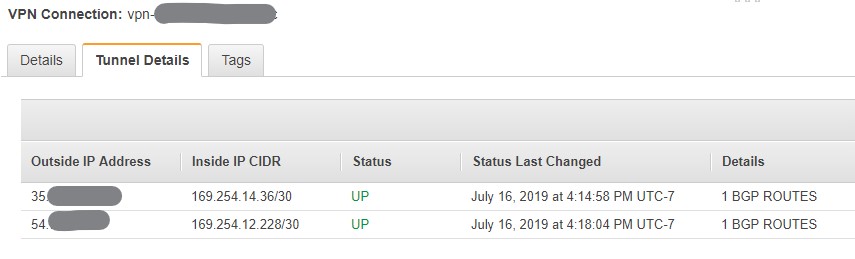
Within the AWS Console you should also be able to see the VPN connections for both tunnels in the state “UP” and should see 1 BGP route - which is the 10.16.16.0/24 network to be received over each tunnel (See Figure 3).
At this point you are all set and your VPN connection along with BGP routing is ready to be used.
Summary
This blog post showed you the setup of an EC2-based VPN endpoint while using Ubuntu Linux 16.04 with Strongswan for a Site-to-Site VPN connection and and FRRouting for BGP. This setup allows you to experiment with BGP in your AWS account. Especially if you are interested in learning more about the interaction of BGP over a Site-to-Site VPN with AWS Transit Gateway, the resulting setup is a great start to do so.
Leave a comment