Using F5 Big-IP LTM with IPv6
Notice: This article is more than 11 years old. It might be outdated.
A very simple way to enable legacy IPv4-based web applications to be reachable via IPv6 is to use an IPv4/IPv6-enabled load balancer to frontend the application. This is e.g. the approach that Netflix took in mid 2012 to enable their service for IPv6 via the AWS Elastic Load Balancers (ELBs).
Architecture
In this post we will use the F5 Big-IP Local Traffic Manager (LTM) load balancer to provide this capability. You can either use a physical device or even better the Virtual Edition.
Figure 1 shows how this approach would work: The End-User will connect to the load balancer via IPv6, which means that the load balancer needs to have an IPv6 address reachable by the end-users on its external facing interface. The load balancer then connects to the legacy IPv4 web application via IPv4. This means that no changes are necessary to this legacy web application.
If you are already using a load balancer to frontend your application for IPv4, this same load balancer can also terminate your IPv6 traffic. But you’re also free to use a separate “IPv6-only” load balancer, if your operational need dictates this.

F5 Big-IP and IPv6
On a first look at the GUI it doesn’t appear that the F5 Big-IP supports IPv6 addresses on its interfaces or for nodes. In the corresponding dialogues there are only fields for “IP Address” and “Netmask”. For IPv6 we would expect a field for a subnet prefix length instead of the netmask. It turns out that these dialogues gladly accept IPv6 addresses in the typical notation of eight groups of four hexadecimal digits separated by colons along with the subnet prefix length translated into a subnet mask following the same notation.
Although this appears to be a bit awkward at first sight, it will turn out to be much less of a hassle quite quickly: RFC 5375 (IPv6 Unicast Address Assignment Considerations) strongly recommends that in IPv6 the subnet prefix length should always be /64. With that we only need to convert this subnet prefix length of /64 into the legacy style netmask notation.
Using the mechanism known from IPv4, the IPv6 subnet mask for a /64 network would therefore be FFFF:FFFF:FFFF:FFFF:0000:0000:0000:0000 or in short FFFF:FFFF:FFFF:FFFF::. Especially the first notation lets us quickly verify that this netmask is correct:
IPv6 addresses are 128 bit long. If we want to mask out a subnet with the length of 64 bit, this would require us to mask out half of the bits. With the previously mentioned notation of eight groups of four hexadecimal digits separated by colons, this translates into the four first groups being FFFF in hex, which translates to all 1s in binary. And the remaining four groups being all zeros.
Note: In older versions of Big-IP, F5 has a bug that doesn’t allow you to use address shortening via double-colons (“::”) through the GUI or tmsh. Instead all IPv6 addresses need to be written out. Thus the address 20BA:DD06:F00D:1234::11 would need to become 20BA:DD06:F00D:1234:0:0:0:11.
Configuration
Configure the external interface for IPv6
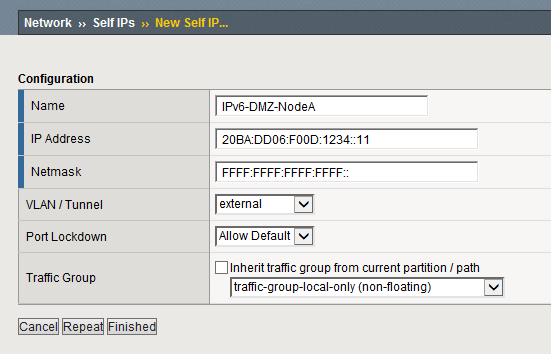
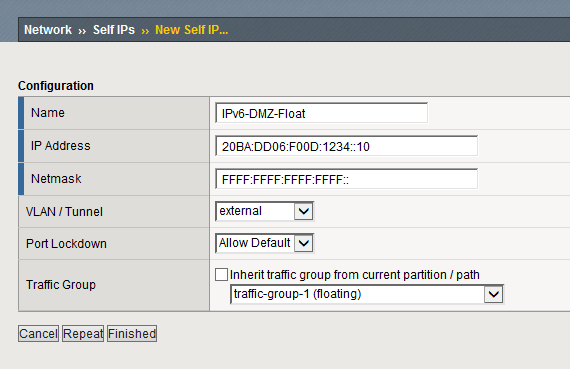
In a first step we need to assign an IPv6 address to the external interface of the F5 Big-IP load balancer. In this example we will use the two IPv6 addresses 20BA:DD06:F00D:1234::11/64 and 20BA:DD06:F00D:1234::12/64 for the actual nodes and 20BA:DD06:F00D:1234::10/64 as the floating address.
Let’s start by creating a new Self-IP under the Network -> Self IPs tab.
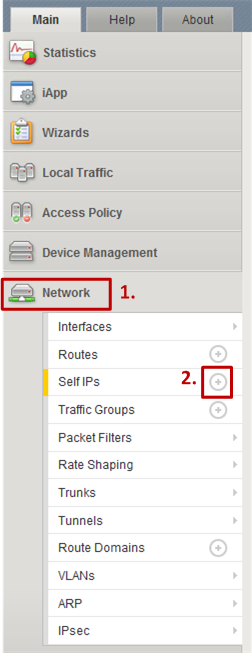
Next enter the IPv6 address for the individual node as the IP address, along with the Netmask of FFFF:FFFF:FFFF:FFFF::. Repeat the same for the second node in an HA setup.
Now we need to configure the floating IPv6 address in a similar way:
Configure an IPv6 Default Route
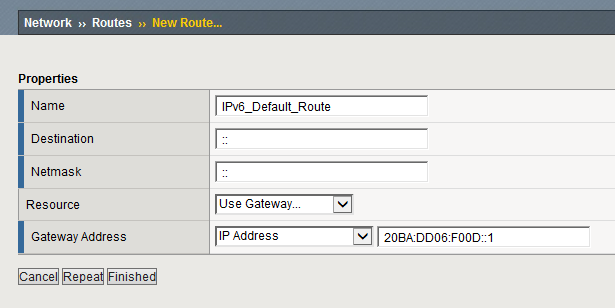
At this point we should be able to ping the previously created IPv6 interfaces from the same IPv6 network. Obviously we want more than this local-only connectivity and therefore need to configure an IPv6 default route on the F5 Big-IP devices. Do so by creating a new route under the Network -> Routes tab.
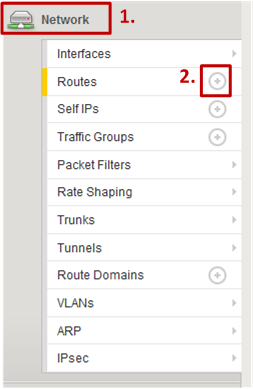
While a default route in IPv4 can be written as 0.0.0.0/0, the IPv6 equivalent is even simpler with ::/0. Thus not only the actual IPv6 address is just ::, but so is also the Netmask. Remember to specify the correct IPv6 address for the gateway as shown in Figure 6.
Creating Virtual Servers
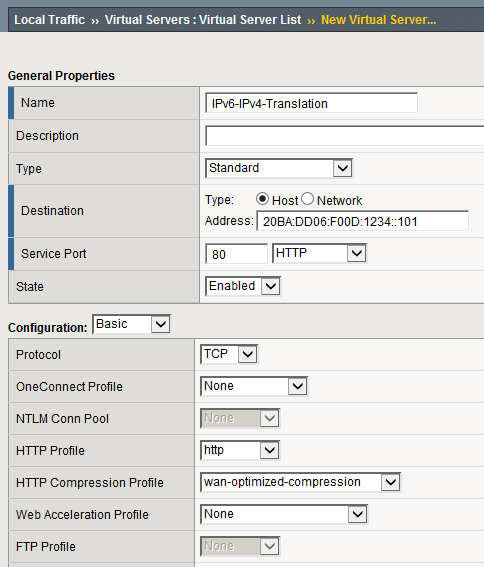
The creation of a virtual server for our legacy IPv4 web application differs only slightly in IPv6 from what you might have already configured for the IPv4 equivalent. Only the IP Address has to be specified as an IPv6 address on the previously configured IPv6 subnet. As Figure 7 shows, all other capabilities can be used the same way.
VMware vCloud Director via IPv6?
In a previous post I have shown how to configure the F5 Big-IP LTM with VMware vCloud Director (vCD) in an IPv4 setup. These two posts combined raise the question whether one could use an F5 Big-IP load balancer to quickly and easily enable VMware vCloud director to be accessible via IPv6 without having to change anything within vCD itself.
It is straight forward and easy to apply the above to the mentioned post and indeed make the HTTP Redirect, the HTTPS traffic and even the Console Proxy available under an IPv6 address via the F5 Big-IP. The HTTP Redirect as well as the HTTPS traffic will work without a flaw, making the web interface of vCD available via IPv6.
Unfortunately it is currently not possible to use the VMware Remote Console (VMRC) via the Console Proxy and IPv6, due to the locally installed VMRC tool incorrectly handling the masking of IPv6 addresses. Thus you will only be able to provide the web portion of vCD via IPv6, while still having to rely on IPv4 for the VMRC part.

Leave a comment