Terminating a 6in4 tunnel on an Arista switch
Notice: This article is more than 11 years old. It might be outdated.
In a previous post I have shown that Arista switches feature a full fledged Linux system underneath the CLI that is accessible to network administrators via the EOS shell.
Let’s use this Linux capability to do something out of the box: Terminate a 6in4 tunnel on an Arista switch to provide IPv6 access.
Via the CLI this is not possible as Arista does not support 6in4 tunnel in EOS. Therefore let’s use the Linux-based EOS shell.
Please keep in mind that the tunnel termination will be handled by the control plane in software and not in hardware. Thus don’t expect any miracles with regards to throughput.
Getting the 6in4 tunnel
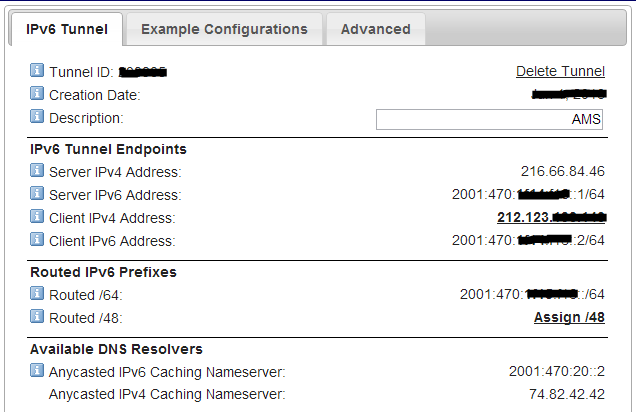
Next we need a service provider delivering us the termination or such a tunnel. The easiest way to achieve this is via Hurricane Electric’s Tunnelbroker service. Within a few minutes you get a 6in4 tunnel this way. Figure 1 shows an example of the details for a 6in4 tunnel provided by Hurricane Electric.
Prerequisites
Before starting with the configuration of the 6in4 tunnel from within the Arista EOS shell, let’s make sure that we can actually contact the service provider’s tunnel endpoint via ping from the Arista CLI.
ams-core01a(config)#ping 216.66.84.46
PING 216.66.84.46 (216.66.84.46) 72(100) bytes of data.
80 bytes from 216.66.84.46: icmp_req=1 ttl=61 time=0.674 ms
80 bytes from 216.66.84.46: icmp_req=2 ttl=61 time=0.642 ms
80 bytes from 216.66.84.46: icmp_req=3 ttl=61 time=0.653 ms
80 bytes from 216.66.84.46: icmp_req=4 ttl=61 time=0.638 ms
80 bytes from 216.66.84.46: icmp_req=5 ttl=61 time=0.656 ms

--- 216.66.84.46 ping statistics ---
5 packets transmitted, 5 received, 0% packet loss, time 4ms
rtt min/avg/max/mdev = 0.638/0.652/0.674/0.030 ms, ipg/ewma 1.039/0.663 ms
Once we confirm connectivity, we can get started with the actual configuration. For this let’s enter into the EOS shell mode and become super user:
ams-core01a#bash

Arista Networks EOS shell

[user@ams-core01a ~]$ sudo -i

Arista Networks EOS shell

-bash-4.1#
Installing necessary modules
In order to configure a 6in4 tunnel under Linux the Simple Internet Transition (SIT) module needs to be loaded. This module is not loaded by default on Arista switches. Let’s do so:
-bash-4.1# modprobe sit
Now we can configure the 6in4 tunnel to Hurricane Electric and make it available under the interface name “he-ipv6”, enable IPv6 on this interface and assign the correct IPv6 address:
-bash-4.1# ip tunnel add he-ipv6 mode sit remote 216.66.84.46 local 212.123.xxx.xxx ttl 255
-bash-4.1# ip link set he-ipv6 up
-bash-4.1# echo 0 > /proc/sys/net/ipv6/conf/he-ipv6/disable_ipv6
-bash-4.1# ip addr add 2001:470:xxxx:xxxx::2/64 dev he-ipv6
-bash-4.1#
The 6in4 tunnel to Hurricane Electric should now be up and running.
Testing
Testing IPv6 connectivity from the EOS shell
Before declaring success, let’s ensure that we can actually carry IPv6 traffic across the tunnel. We will start by attempting to ping the IPv6 address of the tunnel’s remote interface at Hurricane Electric.
-bash-4.1# ping6 2001:470:xxxx:xxxx::1
PING 2001:470:xxxx:xxxx::1(2001:470:xxxx:xxxx::1) 56 data bytes
64 bytes from 2001:470:xxxx:xxxx::1: icmp_seq=1 ttl=64 time=0.742 ms
64 bytes from 2001:470:xxxx:xxxx::1: icmp_seq=2 ttl=64 time=0.739 ms
64 bytes from 2001:470:xxxx:xxxx::1: icmp_seq=3 ttl=64 time=0.715 ms
64 bytes from 2001:470:xxxx:xxxx::1: icmp_seq=4 ttl=64 time=0.693 ms
64 bytes from 2001:470:xxxx:xxxx::1: icmp_seq=5 ttl=64 time=0.720 ms
64 bytes from 2001:470:xxxx:xxxx::1: icmp_seq=6 ttl=64 time=0.732 ms
^C
--- 2001:470:xxxx:xxxx::1 ping statistics ---
6 packets transmitted, 6 received, 0% packet loss, time 5000ms
rtt min/avg/max/mdev = 0.693/0.723/0.742/0.031 ms
Once this works successfully, let’s configure routing beyond this first hop via a default route:
-bash-4.1# ip route add ::/0 dev he-ipv6
Let’s test if this works and ping Google’s public DNS resolver:
-bash-4.1# ping6 2001:4860:4860::8888
PING 2001:4860:4860::8888(2001:4860:4860::8888) 56 data bytes
64 bytes from 2001:4860:4860::8888: icmp_seq=1 ttl=58 time=4.51 ms
64 bytes from 2001:4860:4860::8888: icmp_seq=2 ttl=58 time=4.62 ms
64 bytes from 2001:4860:4860::8888: icmp_seq=3 ttl=58 time=4.57 ms
64 bytes from 2001:4860:4860::8888: icmp_seq=4 ttl=58 time=4.59 ms
64 bytes from 2001:4860:4860::8888: icmp_seq=5 ttl=58 time=4.54 ms
^C
--- 2001:4860:4860::8888 ping statistics ---
5 packets transmitted, 5 received, 0% packet loss, time 4007ms
rtt min/avg/max/mdev = 4.519/4.571/4.626/0.071 ms
-bash-4.1#
It does, which means that we have successfully enabled IPv6 connectivity via a 6in4 tunnel.
Testing IPv6 connectivity from the Arista CLI
So far we have configured the 6in4 tunnel and tested its functionality from the Arista EOS shell. But does that mean that the changes we performed will actually be available to traffic that traverses the switch? In other words: Can we actually connect machines to my Arista switch that will gain IPv6 connectivity this way? Let’s try it out by testing network connectivity from the Arista CLI.
First exit the Arista EOS shell into the CLI.
-bash-4.1# exit
logout
[user@ams-core01a ~]$ exit
logout
Let’s ping the Google DNS resolver again and see what happens:
ams-core01a#ping ipv6 2001:4860:4860::8888
PING 2001:4860:4860::8888(2001:4860:4860::8888) 72 data bytes
72 bytes from 2001:4860:4860::8888: icmp_seq=1 ttl=58 (truncated)
72 bytes from 2001:4860:4860::8888: icmp_seq=2 ttl=58 (truncated)
72 bytes from 2001:4860:4860::8888: icmp_seq=3 ttl=58 (truncated)
72 bytes from 2001:4860:4860::8888: icmp_seq=4 ttl=58 (truncated)
72 bytes from 2001:4860:4860::8888: icmp_seq=5 ttl=58 (truncated)

--- 2001:4860:4860::8888 ping statistics ---
5 packets transmitted, 5 received, 0% packet loss, time 20ms
rtt min/avg/max/mdev = 4.516/4.554/4.623/0.093 ms, ipg/ewma 5.005/4.535 ms
ams-core01a#
That works like a charm.
Of course there must be some drawback to all of this: As the interface “he-ipv6” is not known to the Arista CLI, it will not be displayed from within the CLI. Thus it appears like hidden from the network administrator and is only accessible via the EOS shell. This makes troubleshooting a bit more challenging as e.g. the IPv6 routing table will appear to be empty even though we just verified that we have IPv6 connectivity to the Internet.
ams-core01a#sh ipv6 route ::/0
IPv6 Routing Table - 35 entries
Codes: C - connected, S - static, K - kernel, O - OSPF, B - BGP, R - RIP, A - Aggregate


ams-core01a#
Final remarks
Please keep in mind that due to the operational challenges around troubleshooting the above setup as well as the rather mediocre throughput of the 6in4 tunnel, this configuration is not recommended for production usage. Also keep in mind that the above changes would not survive a reboot of the switch.
Instead this article showed you how powerful Arista’s underlying Linux OS really is.
Leave a comment