Network device configuration management with Rancid and Trac on Ubuntu 12.04 LTS
Notice: This article is more than 11 years old. It might be outdated.
Inroduction
Today we want to look at the possibility to automatically save the text-based configuration of network devices and make them browse-able via a web-based interface. The solution will also discover configuration changes and notify the network operations team of these changes.
To do so we will be using RANCID (Really Awesome New Cisco confIg Differ) from Shrubbery Networks as well as TRAC (Integrated SCM & Project Management).
RANCID monitors a router’s (or more generally a device’s) configuration, including software and hardware (cards, serial numbers, etc) and uses CVS (Concurrent Version System) or Subversion to maintain history of changes and notify users of these. TRAC is a web-based wiki and issue tracking system for software development projects. It provides an interface to Subversion or Git, which is the primary reason for using it in this project.
Prerequisites
This documentation assumes that a healthy Ubuntu 10.04.4 LTS Server, fully functioning, up-to-date system is available. This e.g. includes a combination of sudo apt-get update, sudo apt-get upgrade, sudo apt-get dist-upgrade, and sudo apt-get autoremove being run. Please understand what the commands do before blindly running them as any system update has the potential to render a system inoperable. The server should be deployed with at least the software selection of OpenSSH server and LAMP server.
This documentation is accurate as of May 31, 2013. These steps have been performed on Ubuntu 10.04.4 Server systems and confirmed to work as described here.
Update from June 27, 2014: Trac has added support for Git in never versions. In order to unify configuration of the various version control systems in Trac, the syntax for specifying what system you are using has changed. In Trac 1.0 (trunk, starting from r11082), the components for Subversion support have been moved below tracopt. So you need to explicitly enable them in your Components section within trac.ini. See here fore more details. You will need this information in the “Final Customization” section below.
RANCID
Installing RANCID
Install RANCID as well as Subversion via the Ubuntu software repository:
sudo apt-get install rancid subversion
Configuring RANCID
The installation creates a new user and group named “rancid” with a home directory of /var/lib/rancid. Now, we must create at least one device group in RANCID to logically organize our devices. Groups can be based on any criteria you wish. So if you’ve got one physical location you could create “router”, “firewall”, and “switch” groups, or, in larger environments with multiple physical locations, group names such as “Los Angeles”, “San Francisco”, and “New York” may be a better choice. Or in smaller setups you could chose to use a single group. For this example we’ll create a single group called “network”.
Before editing the sample file, it’s good practice to start by making a backup copy of the original rancid.conf file.
sudo cp /etc/rancid/rancid.conf /etc/rancid/rancid.conf.ORIGINAL
Open the file “/etc/rancid/rancid.conf” in your favorite text editor, add a line similar to the following, and save and exit.
LIST_OF_GROUPS="network"
By default RANCID uses CVS to store the retrieved device configuration. But we want to use Subversion (SVN) instead, as Trac is build around this source code repository system.
Therefore locate the current CVS configuration within the file /etc/rancid/rancid.conf and change it to SVN:
CVSROOT=$BASEDIR/CVS; export CVSROOT
RCSSYS=cvs; export RCSSYS
Change these settings to SVN:
CVSROOT=$BASEDIR/SVN; export CVSROOT
RCSSYS=svn; export RCSSYS
Configure E-Mail Notification
Next we want to configure the system, so that RANCID can send e-mail notifications for changes performed on each group of devices. For this a local MTA should be installed and configured.
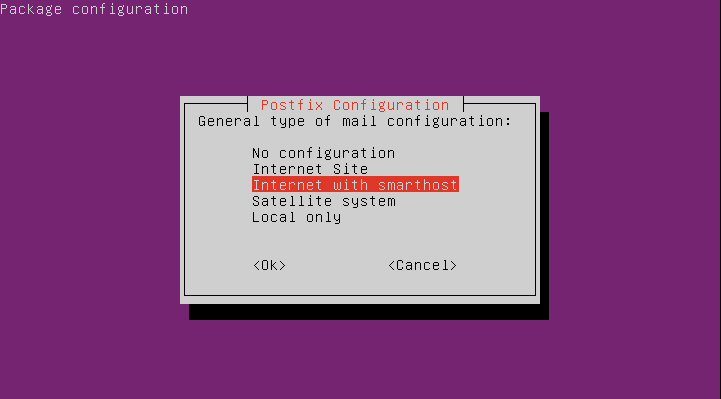
For this documentation we will assume that this MTA will be Postfix, configured with as “Internet with smarthost”.
Install Postfix
sudo apt-get install postfix
As the mail configuration type choose “Internet with smarthost”:

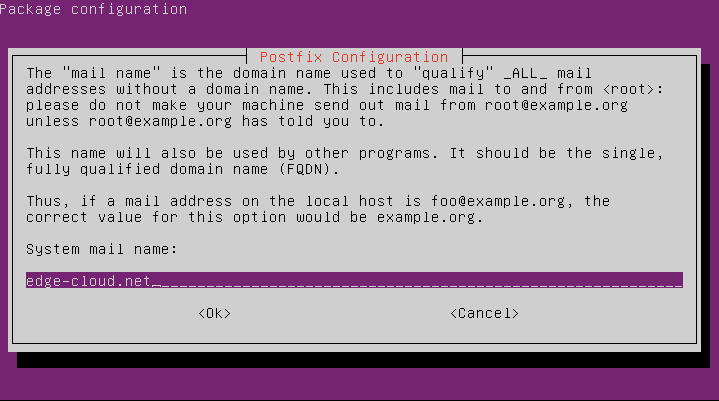
Next, specify your e-mail domain as the system mail name:

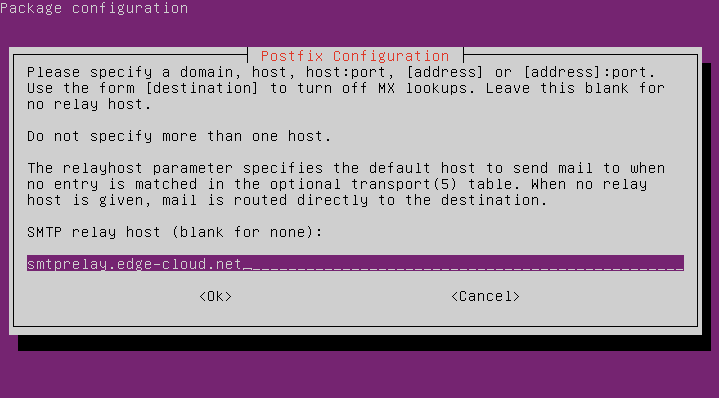
Last, specify the hostname or IP address of your SMTP smart relay:

Now that the MTA has been configured, we can create e-mail aliases in the MTA’s configuration file for each RANCID device group. By default on Ubuntu this is the “/etc/aliases” file.
For each group that you created, we need to add two aliases to the aliases file named “rancid-
rancid-network:               your_email@address.com
rancid-admin-network:         your_email@address.com
After saving your changes and exiting, you’ll need to let your MTA know about the changes by running:
sudo /usr/bin/newaliases
Subversion Repository
Your device’s configuration files will be stored in a Subversion (SVN). This provides a way to track changes over time as well as provides you with a bit of disaster recovery. In order to prepare SVN we must create a folder structure based off of the RANCID groups that we created earlier. This command needs to be run as the “rancid” user that was created when the RANCID software was first installed.
[user@netconf ~]$ sudo su - rancid
[rancid@netconf ~]$ /var/lib/rancid/bin/rancid-cvs

Committed revision 1.
Checked out revision 1.
At revision 1.
A         configs
Adding         configs

Committed revision 2.
A         router.db
Adding         router.db
Transmitting file data .
Committed revision 3.
Assuming that runs without any errors, you should see one or more new directories created under “/var/lib/rancid”, named according to the RANCID groups you defined earlier (e.g. “/var/lib/rancid/network”). Inside each will be a file named “router.db”:
[rancid@netconf ~]$ find /var/lib/rancid -type f -name router.db
/var/lib/rancid/network/router.db
Make the SVN readable by the www-data group - used by the Apache web server, so it can be accessed by TRAC:
[rancid@netconf ~]$ exit
[user@netconf ~]$ sudo chgrp -R www-data /var/lib/rancid/SVN/
[user@netconf ~]$ sudo chmod -R g+r /var/lib/rancid/SVN/
Specify devices in the router.db Files
Inside each of these “router.db” files is where we let RANCID know what devices exist in each location. A single line in each file is used to identify a single device. The format of the definitions is of the format “hostname:type:status”, where “hostname” is the fully-qualified domain name or IP address, “type” defines the type of device (e.g. “cisco”, “hp”, “foundry”, etc.) and “status” is either “up” or “down”. If “status” is set to “down”, RANCID will simply ignore the device.
Sample entries might look like this:
router.edge-cloud.net:cisco:up
firewall.edge-cloud.net:juniper:down
switch.edge-cloud.net:arista:down
Refer to man router.db for more details
Device login credentials via cloginrc
Once you have successfully added your devices to the appropriate “router.db” files, we need to let RANCID know how to access the devices (telnet, SSH, etc.) and what credentials to use to login. This is done via the “.cloginrc” file that exists in the rancid user’s home directory (“/var/lib/rancid/.cloginrc”, by default).
It is a good security practice to never connect to devices via telnet, so this guide will only cover the SSH method of connecting to a device. Other connection methods are also supported. The way the .cloginrc file is configured also depends on how the end device is configured to authenticate users. Users can be configured locally or a device can authenticate users agains an enterprise system such as RADIUS, LDAP or Active Directory. It gets complicated quickly so make sure that you take your time and read the documentation all the way through.
Refer to man cloginrc to see the details of all the available options and keywords available for use.
This guide will assume the simplest setup in which local usernames and passwords are defined on the end devices themselves. Keep in that mind that the file .cloginrc should not be world readable/writable and be owned by the user rancid, created earlier.
Here’s some example information for a .cloginrc file:
#Firewall
add method firewall.edge-cloud.net ssh
add user firewall.edge-cloud.net rancid
add password firewall.edge-cloud.net user_password enable_password
Testing
The basic test utilizes the clogin application to verify login into a device:
[user@netconf ~]$ sudo su -c "/usr/lib/rancid/bin/clogin -f /var/lib/rancid/.cloginrc firewall.edge-cloud.net" -s /bin/bash -l rancid
The clogin application will use the .clogin configuration file specified by the -f variable and will automatically login to the device named firewall.edge-cloud.net. When it’s all said and done you should end up in enable mode on the firewall device. If there are problems, clogin does an excellent job of providing pointed advice on what is wrong.
With RANCID now configured, it’s time to test it out! Let’s manually invoke “rancid-run” (as the “rancid” user) to see if everything works!
[user@netconf ~]$ sudo su -c /usr/lib/rancid/bin/rancid-run -s /bin/bash -l rancid
This command may take a while to run, depending on how many devices you have configured. Be patient and, when it finishes, review the logfiles created in “/var/log/rancid”.
Assuming all goes well, you should receive e-mails from RANCID sent to the addresses that you defined in earlier in “/etc/aliases”.
Automation
Once everything is working, it’s time to automate the collection and archiving. The easiest way to do this is to simply create a cronjob under the rancid user that calls “rancid-run” for us on a periodic basis. Here we have RANCID run every 15 minutes to ensure that all network changes are caught quickly.
[user@netconf ~]$ sudo su -c "/usr/bin/crontab -e -u rancid"
Modify the contents of the file so that you end up with something like this.
    # m h  dom mon dow   command
    */15 * * * * /usr/bin/rancid-run
Trac
Install Trac
Next we will install and configure Trac as a web-based GUI to browse the device configuration stores in SVN.
Install Trac and the necessary Apache modules via the Ubuntu software repository:
sudo apt-get install trac libapache2-mod-python
Configure a new Trac project environment:
sudo mkdir -p /var/trac/netconf
cd /var/trac/netconf
sudo trac-admin . initenv Netconf sqlite:db/trac.db
sudo htpasswd -bc .htpasswd adminusername <mypassword>
sudo trac-admin . permission add adminusername TRAC_ADMIN
sudo chown -R www-data: .
sudo chmod -R 775 .
Next, configure your Apache Webserver for Trac. In this example we will replace the default Apache Website and therefore replace the file /etc/apache2/sites-available/default with the following content:
    <VirtualHost *:80>
            ServerName netconf.edge-cloud.net
            <Location />
               SetHandler mod_python
               PythonInterpreter main_interpreter
               PythonHandler trac.web.modpython_frontend
               PythonOption TracEnv /var/trac/netconf
               PythonOption TracEnvParentDir /var/trac/netconf
               PythonOption TracUriRoot /
                # PythonOption TracEnvIndexTemplate /var/local/trac/templates/index-template.html
               PythonOption TracLocale en_US.UTF8
               PythonOption PYTHON_EGG_CACHE /tmp
               Order allow,deny
               Allow from all
            </Location>
            <Location /login>
              AuthType Basic
              AuthName "Netconf"
              AuthUserFile /var/trac/netconf/.htpasswd
              Require valid-user
            </Location>
    </VirtualHost>
Restart the Apache service with sudo service apache2 restart.
Enabling SVN in TRAC
The TRAC SVN browser is disabled at this stage as the SVN path hasn’t been configured yet. Let’s configure the SVN path in TRAC now.
Edit the TRAC configuration file /var/trac/netconf/conf/trac.ini.
Add the SVN repository:
repository_dir = /var/lib/rancid/SVN/
Final customizations
Although your installation should be running at this point, we want to perform some final customization to “pretty it up”. This includes adding a logo to TRAC, enabling the SVN browser and disabling any module not used.
Make the SVN Browser the default module to load when accessing the web interface:
[trac]
...
default_handler = BrowserModule
Disable all modules that you don’t need. TRAC’s Wiki and Ticket module could very well be used for network documentation purposes as well as tracking configuration change requests. In this documentation we will focus on solely using the SVN browser.
Add the following block yo your TRAC configuration file:
[mainnav]
wiki = disabled
timeline = disabled
roadmap = disabled
tickets = disabled
newticket = disabled
search = disabled

[metanav]
login = disabled
logout = disabled
prefs = disabled
help = disabled
Place the file of a logo - e.g. netconf.png - for your TRAC website into the folder /var/trac/netconf/htdocs/ and enable it within the TRAC configuration file /var/trac/netconf/conf/trac.ini:
[header_logo]
alt = NetConf
height = 72
link = /
src = site/netconf.png
width = 236
Results
The result of your TRAC website will look like this:

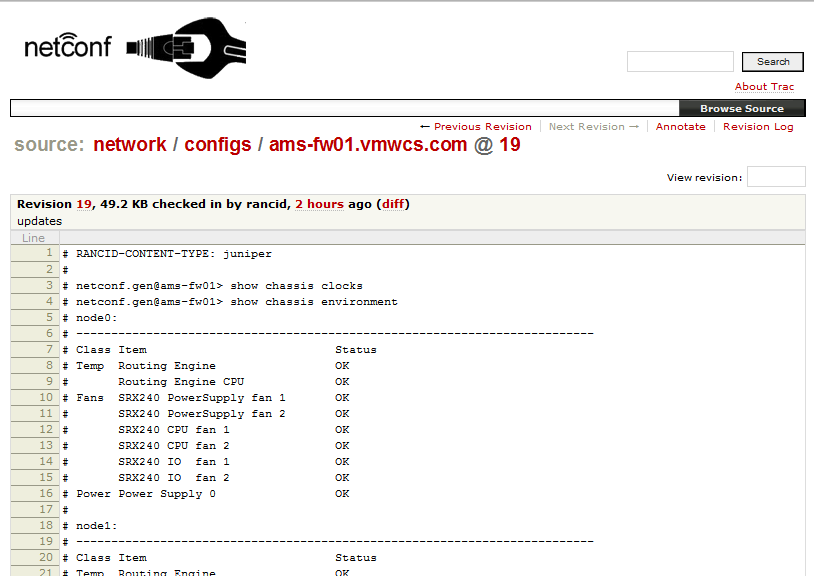
Drilling down into your device groups and actual device will then reveal the current configuration of a device:

TRAC offers multiple very interesting features for e.g. downloading the current configuration as a text file or comparing differences between revisions. Enjoy your new network device configuration management solution.

Leave a comment